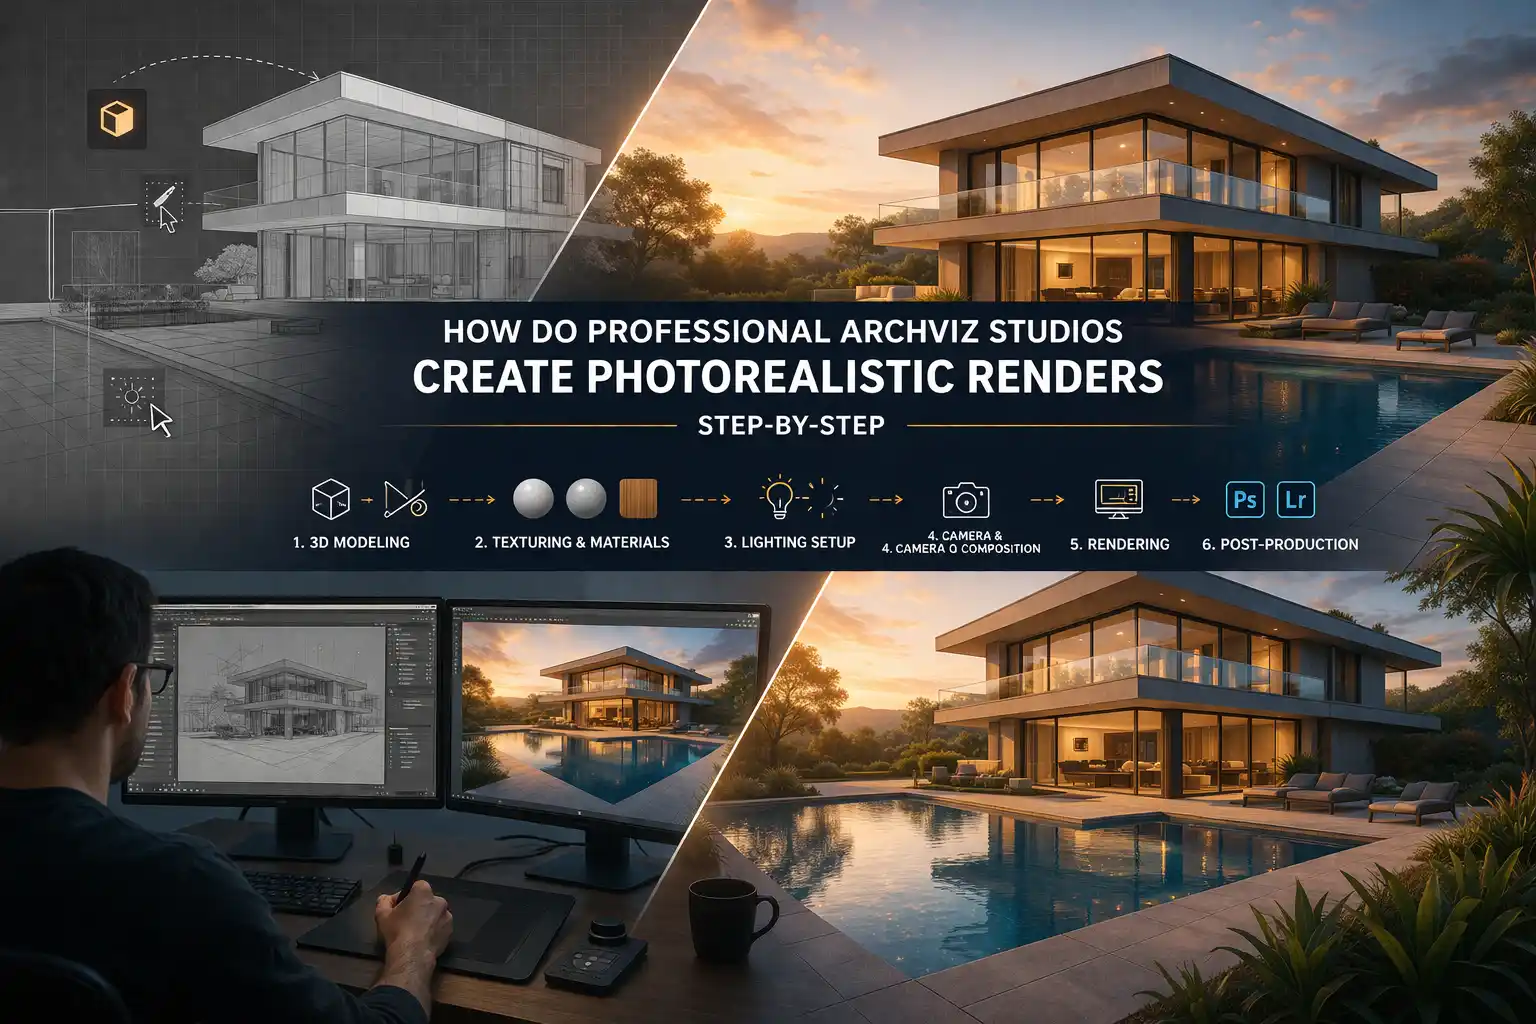
How Do Professional ArchViz Studios Create Photorealistic Renders Step-by-Step
Professional ArchViz Studios uses three-dimensional rendering at some stage to virtually present their projects. Now, there is a huge demand for realistic visuals to attract buyers and investors. It can be for a luxury high-rise building or a boutique. This is commonly known as ArchViz. It has become the language through which the architects, designers, and clients communicate their concepts. Photo-realistic visuals have become the most trendy tool in the current year.
Architects and architectural rendering firms alike aimed for visualizations. But what exactly goes on behind the scenes at a studio? We will show you how skilled artists deliver renders that attract emotions. Professional 3D rendering services are developed with the help of tools. They show life-like visuals to the clients before the construction process starts and save their budget.
You need to understand how professional ArchViz Studios Create Photorealistic Renders Step-by-Step!
Detailed steps to create photo-realistic renders
Stage 1: Project Briefing and Reference Gathering
Before anything, the professional studios invest their time in understanding the project. This includes the consultation with the clients because every creative decision is made according to the client’s needs. In this stage, the experts do the following tasks:
- Reviewing architectural drawings, CAD files, etc.
- Gathering reference images and material samples
- Discussing the target audience
- Establishing the visual tone
In easy words, the rendering converts your concepts into real or fake images. Do not get confused! This means they create fake images, but they look like you are watching a real constructed building. Plus, the investors and other involved teams can clearly understand the design through these visuals. This reduces misunderstandings and the project moves further without any hurdle.
Stage 2: 3D Modeling
Keep in mind that there are three main elements to a photo-realistic rendering.
- a detailed 3D model
- lifelike materials
- accurate lighting
If you have done this job right, then you will achieve accuracy. But if one of them is not correct, then the images will not provide a real effect to the clients.
The 3D model is built first. Professional 3D architectural modeling services use advanced tools such as 3ds Max, SketchUp, Revit, etc. They follow the strict rules to ensure clean results. Its checklist is:
- Model in real-world units from the very first click
- Delete hidden faces, stray vertices, and overlapping meshes to keep the scene clean
- Optimize topology for smooth shading
- Name and layer everything properly to avoid material assignment
- Flip any inverted normals before texturing, because they will render black
- Run a low-resolution clay render to check massing, edge highlights, etc.
Stage 3: Texturing and Material Assignment
After modelling, the artist moves on to texturing. It is one of the creative phases of the workflow.
The quality of materials is what separates a “good” render from a truly photorealistic one.
Applying high-quality textures on surfaces and adjusting materials is important to match real-life appearances. They use proper UV mapping so they don’t appear blurry! A professional Architectural Visualization Company:
- Use PBR material libraries like Quixel Megascans or similar high-resolution asset libraries
- Apply subtle imperfections to every surface
- Drop a 5–10% noise into the roughness channel of every glossy material to remove the CG look. This way, the surfaces appear naturally worn and real
- Maintain consistent texture scale across all objects
- Add more wear on object edges than on flat surfaces,
Stage 4: Lighting Setup
Lighting is one of the most important element that makes a picture more real. It shows the mood and the emotions.
Professional Archviz studios treat this stage with the same care a cinematographer gives to lighting a film set.
- Use a mix of sunlight through windows and interior light fixtures for realism
- Balance shadows with soft lighting effects
- Introduce contrast by adjusting light angles or adding fill lights to create soft shadow gradients
- Match the HDRI sky to the target geographic location for maximum believability
- Test multiple sun positions and weather conditions before committing to a final setup
Stage 5: Camera Composition and Scene Staging
If the conversation is weak, then a render can never be perfect.
Professional ArchViz artists think like photographers when setting up their cameras.
- Approach the rendering process like photography
- Choose a camera angle
- Avoid extremely wide-angle lenses that distort the view
- Apply depth of field to create a cinematic focal point
- Add entourage
Stage 6: Atmosphere and Environmental Effects
Top studios go beyond light to inject atmosphere into their renders. This transforms a technically accurate image into the best visual experience. The experts use the following techniques:
- Use volumetric light to create moody interiors
- Add wet ground reflections for rainy or post-rain scenarios
- Add sky replacements using HDRI domes
- Use particle systems to simulate rain, etc.
Stage 7: Rendering Phase
This is a complex process of calculating how every ray of light interacts with every surface.
For large scenes, experts use a network of powerful computers that work together to render complex 3D visualizations! Make sure to:
- Set render resolution to a minimum of 4K
- Use multi-pass rendering to export separate channels
- Allow proper sampling rates to eliminate noise
- Use denoising tools
Conclusion
We have given the main steps of the process that Professional ArchViz Studios implement. However, this process needs to be very sequential. It consists of multiple stages and every stage is dependent on the others. All the make sure to match the needs of the clients.